MAC Remote Desktop
First-time setup of the Remote Desktop Connection on a MAC.
NOTE: You will not use one of the Remote Desktop icons that you received from Support. Instead, you will be creating your own. Please follow these instructions carefully. (You’ll only need to do this once. You will not have to do this every time you log on.)
NOTE: There are two user IDs and two passwords involved. (1) The user ID or PC name for connecting to the server is 54.86.20.75:xxxx. The password is a word followed by a hyphen and a digit. (2) The user ID for MemInfo, itself, is assigned by your master user. It will consist of an abbreviation of your church name (which tech support will give you) followed by your name or role. The first time you log on, it will ask for your ID and password; leave the password blank, and then it will ask you to create one.
Step 1: Create a folder on your desktop named “MemInfoTransfer” (no spaces!). You don’t need to put anything into it, just create it.
Step 2: Download and install the latest version of the Microsoft Remote Desktop from the iTunes Apple Store. Bring up your browser and go to…
https://apps.apple.com/us/app/microsoft-remote-desktop-10/id1295203466?mt=12
[NOTE: This link might be out of date.]
Click the “Get” button that is below the red icon.
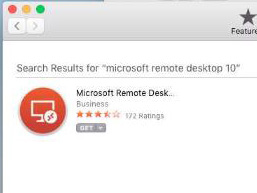
[NOTE: Older versions of Mac OS might have to find an older version of the Microsoft Remote Desktop]
Step 3: Move or copy the icon for “Microsoft Remote Desktop” (that you installed in Step 2) to your own Desktop
There might be multiple versions of the Remote Desktop Connection on your computer. Make sure you are clicking the correct one! (NOTE: Do not delete the old ones until you know that the new one works properly, or if you are using the old ones for anything else.)
PLEASE NOTE: The 5 options below might be incorrect. It depends on which version of the Mac operating system you are using. You are pretty much on your own to figure this out:
| New proper icon???: | Old wrong icon: | Old wrong icon: | Old wrong icon: | Old wrong icon: |
 |
 |
 |
 |
 |
Step 4:
(a) Double-click that “Microsoft Remote Desktop” icon.
(b) Click “Add desktop”

(c) Click the “Show More” button in the lower left-hand corner.
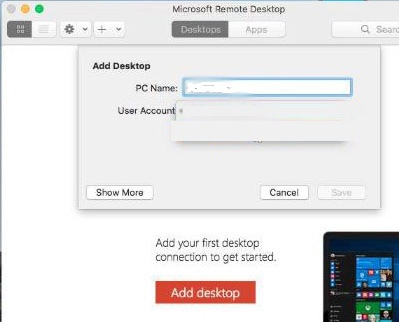
(d) PC Name: type 54.86.20.75:xxxx (MemInfo Support will give you a 4-digit number to replace the xxxx)
User Account: type CORP\xxxxxx-x (MemInfo Support will give you your xxxxxx-x number.)
Friendly Name: type MemInfo
Check “Reconnect if the connection is dropped.”

(e) Click on the “Devices & Audio” tab (or it might say “Local Resources”).
Check “Clipboard” at the bottom. Do not check “Printers” or “Smart Cards”.
Click the “Folders” tab at the top.
Put a checkmark for “Redirect folders” by clicking it.
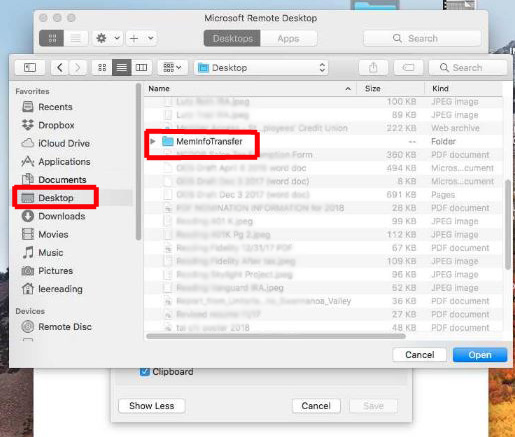
Then click the “+” in the lower left-hand corner. You want to add your MemInfoTransfer folder that you created on your desktop.
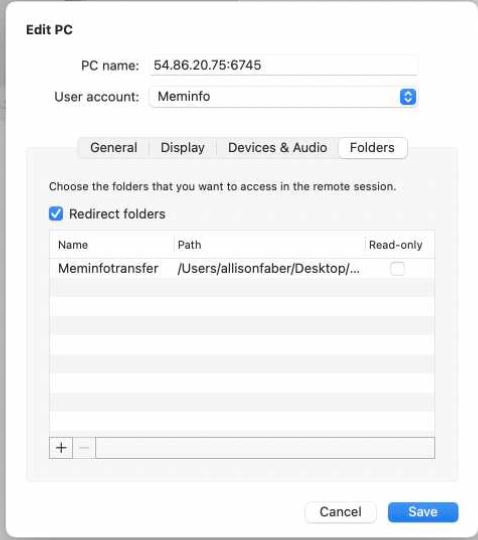
(f) click the Save button.
And you are set!!!
Step 5:
Now, to actually connect to the server and use MemInfo:
You’ll click your new MemInfo icon

It will ask for your password. This is the password that you were given for the xxxxxx-x number. It’s not your MemInfo user ID.
If you see this screen, you should click to say that you trust it.
Check-mark “Always trust…” and click where it says “Trust”

Make sure that there is a check mark next to “Always trust WIN-…”
(Unfortunately, in this graphic, it is not marked.)

If you see this screen, then enter the corp\xxxxxx-x ID and password.

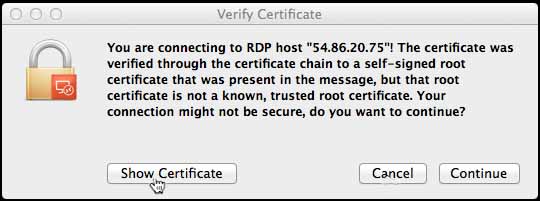
If you see this screen, click on “Show Certificate”
Then when you see this screen, click “Always trust these certificates” and then click “Continue”

Then you won’t have to go through these screens again.
And you are good to go!
NOTE: If reports are not ending up in your MemInfoTransfer folder, in MemInfo choose File | About from the menu. “Local Transfer Folder” should say “\\tsclient\meminfotransfer\”.
When you logoff from the MemInfo Server, it might take between 5 and 20 seconds before your own desktop will appear. You’ll need to wait.